A place to share our talents & creativity

Follow

Followers

Monday, January 30, 2012

Bar Stool Makeover

           
  BEFORE                         &                         AFTER


As you can see my kitchen bar stools desperately needed a makeover.  Since brand new ones were not in the budget, the makeover was inevitable.
I was on a friends blog and saw her darling stool makeover. I just had to do the same to mine. Here is her colorful idea. 


Here is what you will need:
  • Sander/sand paper
  • Paint ( I prefer spray paint)
  • Fancy card stock paper (from Micheal's Crafts)
  • Mod Podge (love, love this stuff also from Micheal's)

A few years ago I made the mistake of skipping the sanding step and painted over the existing varnished wood.  My kids loved to scrape the paint off with their fingernails or whatever toy was in their hand. So I learned my lesson and sanded then painted them black this time.


I am not as bold with color as my Friend, so I went with Taupe on the top with black Fancy card stock paper.


Once I painted the top, I then traced the circle and cut the card stock.


Then comes the MOD PODGE!!! Love love this stuff.  I applied it to the top of the stool then over the card stock and around the sides.


Mod Podge makes it shiny with a hard and tough surface that is wipe-able . So no more scratching the paint and no stains.


and VOILA! Here is the finished product. Much much better than what I had before. I love my new kitchen bar stools.

Saturday, January 28, 2012

Recycled Calender - Valentines

 So... remember my Christmas Advent Calender?


Well it was such a hit with my kids that I just had to keep it going.  I thought Valentines was a good Holiday to use it again.


I just used the same sheet metal.  I switched out the ribbon & I used Photo Shop to whip up a quick and personalized Calender.  I found these cute gift boxes (at Michael's crafts) and instead of gluing the magnets to the back, I just put them inside the boxes and they work just fine. I have 6 boxes for my family of 6.  Then added a couple of hanging hearts.

So instead of getting a treat everyday, my Family and I are going to fill our boxes every time we do a good deed.  Weather it's for a Family member or someone we don't know, we are going to try to do service or a good deed everyday and we get to put a treat in our box when we do so. Then on Valentines Day we get our box of goodies. 

Happy LOVE Day everyone!

Tuesday, January 17, 2012

Fun with Canvas

1. Canvas Hair Accessory Holder

I've heard about these before and have always knew I needed one, just never got around to it. So my daughter shares a room with her little brother and their colors are red & blue, so I thought I'd stick to those colors instead of pink & black (my fav).


Here is what you need
  • 1- canvas (your desired size)
  • Fabric
  • Scissors
  • Hot glue gun
  • Hot glue
  • Staple gun with staples
  • Ribbon
  • Hooks
  • Lay your fabric out on a flat working surface. Decide if you would like your hair bow holder to hang vertically or horizontally. Lay the canvas on the fabric and cut the fabric to size of canvas, adding 1.5 inches per side. This will allow you to fold the fabric over to the back of the canvas.
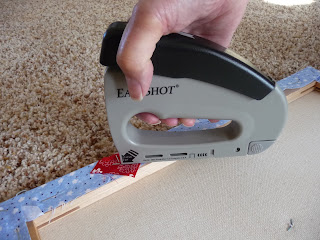
  • Turn the canvas over and bring up one side of the canvas. Staple the fabric onto the back board of the canvas. Repeat this process on the remaining three sides, folding the corners in to create a clean corner. Pull the fabric tight before stapling so that the fabric does not bind when adding the ribbons.
  • Lay out ribbons and staple them onto the back of the canvas. Try choosing different widths and textures of ribbons for added interest to your hair bow holder.


  • Use hooks on the side or bottom for any other accessories. 
  • Then add Bows, Headbands, Hair ties, etc.


Tuesday, January 10, 2012

Rainbow cupcakes

Rainbow cupcakes


My Daughter loves Rainbows & she asked for cute cupcakes for her 6th Birthday Party. So I saw the cutest rainbow cupcakes on Pintrest but I could not replicate them, so this is the closest I could do.


  • I baked them as usual following the instructions on the box.
  • Then used blue food coloring to color the icing, then applied the base layer for the SKY. Then let that dry.


  • Next I took the edible Sparkle Gel Icing ( I picked up at MICHEAL'S) and made the Rainbows. I let them dry as well.
  • Then with the white icing I applied the CLOUDS.


I found cute Basket cupcake holders (also from MICHAEL'S) to serve them with. My Daughter was so excited to show her friends.